

Now that Thanksgiving is over, I feel that the holiday season is really in full swing. Hanukkah and Christmas are right around the corner, then it will be New Years! I am still in total shock that 2015 is coming to an end. It just seems that this year flew by.
So I have been shopping for our family gifts for the holidays using my holiday gift organizer from my holiday binder! I am writing down what I have purchased each family member, the amount I spent, if I wrapped the gift, and if it was delivered. Then I typically make cards for our family and friends. I love having the kids help make the cards to add a personal touch from us.
I always feel like it is such a nice, thoughtful gesture to add handmade cards to the gifts. When our family or friends give us gifts, I always like to save the cards that come with the gifts. I also write down the gift from that person on the back of the cards. But trying to keep all the cards for every occasion can be challenging, which is why I am sharing how I store all our cards.

I have been keeping cards since Ben and I got engaged. But trying to figure out what to do with the cards seemed a little cumbersome. There were engagement cards, shower cards, wedding cards…I wasn’t sure what I should do with all the cards we got, but knew I had to keep them.
I originally had the cards stored in a photo box. But as the card pile grew, the photo box wasn’t big enough to hold everything. I needed another option to store the cards. I ended up deciding to turn the cards into a book using binder ring clips and a hole-punch, then decorating the cover using sturdy card stock and embellishments.

Taking a card and single hole-punch, I punched two holes into the cards so that I was still able to see the card and read the writing on the inside of the card. I continued this process for all the cards we had for our engagement.

Then, I took the binder ring clips, and attached all the cards to the binder clips to make a book. Once all the cards were attached, I created a cover and back cover for the “book” of cards. I wanted to make sure that I labeled each book, so I used stickers and decorative paper to embellish.

I continued this same process for our shower cards, and our wedding cards. It is really nice to have all the cards all together, securely attached to the binder ring clips. And I love the covers because they make the cards look like a book.

When Eli was first born, we received so many cards that I knew I wanted to do something special with the cards, so I decided to make a card book for him as well. I did a single hole-punch with his cards and created a decorative cover. This turned more into a keepsake than a book, which I thought would be nice to add to his personal bin. I have his baby shoes, baby blanket, and other goodies that he made in that bin, so the cards would fit perfectly into the mix.
This started the tradition of me creating card books for each holiday and birthday for each child. Each year, I create a book of cards the kids received for their birthdays into a card book. Then for the holidays, they get another book with cards from all the family and friends who they got presents from. I make sure to write what the gift was on the back of the card, so we can remember what special gift was given to them. 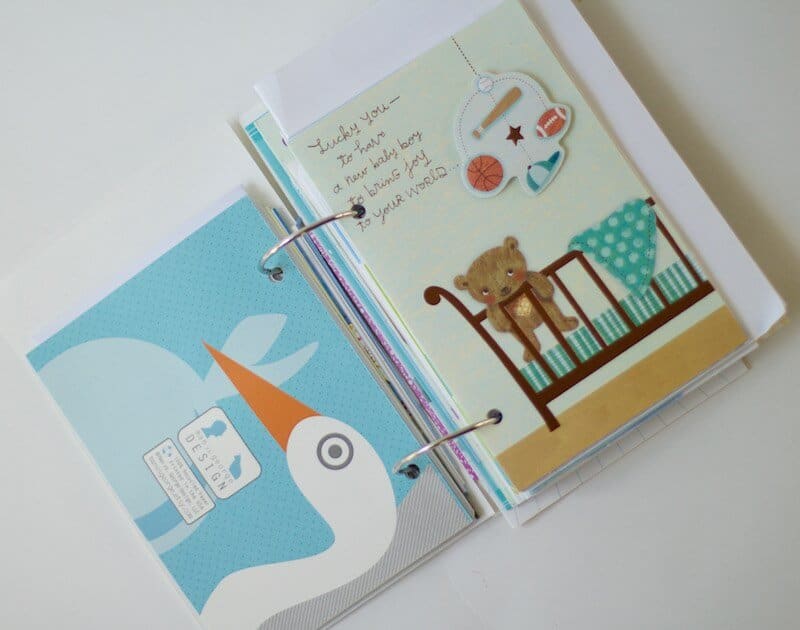
Now, when you are getting all the presents from family and friends this holiday, stack up all the cards you get for each kid and make a card book. Record what each person got on the back of each card. Using a single hole-punch, punch a hole or two in each card, making sure you can still read the inside of the cards. Then, attach each card to a binder ring clip. Create a decorative and festive cover using sturdy card stock. Embellish and label the cover. Use sturdy card stock to hold the card book together. Add the card book to your child’s memory box to cherish for years to come!

")


