

Have you seen any of those gorgeous and beautifully decorated planners that are floating around Instagram? I never really got why people spend so much time decorating a planner until this year.
I have always used a planner to keep myself organized, but I really started using effective daily planning strategies towards the end of last year to keep myself organized. I would see these decked-out planners and think that was too much effort to keep up with. But, slowly, I have realized how fun it can be!
I have now become a #planneraddict myself when setting up my planner. I am really enjoying decorating my planner because it is another way to create a scrapbook of our daily lives. If I add pictures or notes about things that happened throughout the week, I will have documented evidence of our lives.
I have tried to keep scrapbooks for both kids, but that has been a total fail. I think I am on month 3 of my son (who is now 3.5 years old). And I think I have a pile of pictures of my daughter somewhere.
I found that by keeping my planners decorated with notes and pictures of things that are going on, I am able to keep a daily scrapbook rather than try to find time to create another project that I am obviously struggling to find time for.
Ok, so where do you start? It’s actually really easy! Just grab a few supplies and get to creating and decorating. I will say to use the first few weeks as testers. You can really plan out how you will set up your planner or just stick pieces everywhere. Find out what works and then build from there.

1. Colors
I love to start with a color theme. My Life Planner has different weeks being different colors, so I like to add to colors by staying in that particular color family. I’ll pull 4-5 colors that work with the color on the page and just use those to create my theme for the week. If there is a holiday, I will try to use colors that are similar to that holiday as I pull colors as well!
2. Layout
Planners come in either horizontal or vertical page layout. This is a total personal preference, so you decide on how you like to look at your week! For me, I open my planner to the two pages for the week and start figuring out how to design the week. I typically decorate the sides of my planner and add a few details for each day. I will use stickers, paper, and other embellishments to decorate for the week.
3. Planning
Once my planner is designed, I will add in important information for the week. Any appointments, notes, or news will be written into the planner. When my daughter started to talk, I added in the date that she said her first words. When my in-laws got a new dog, I added that into my planner. All of this is records of what happened over the course of the year, which makes for some meaningful memories. I also am trying to add at least one picture a week to the planner.
So this week, I used a new product to set up my planner and make things more personal. I am loving the results of using the Diamond Press Crafter’s Companion Die Cutter and Embosser and my Xyron products.

Materials For This Project
Xyron 1.5″ Sticker Maker
Diamond Press Crafter’s Companion Die Cutter and Embosser
Paper Cutter
Scissors
Colored Pencils
Planner (I am using the Erin Cordren Life Planner)
Your Imagination
Tutorial
- Open you planner to show the week you are planning.
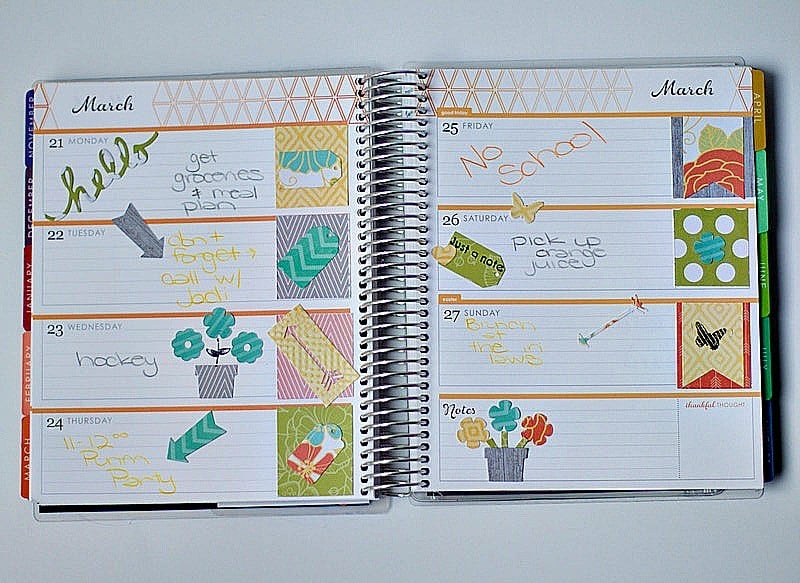
- Select a color theme that works with your planner. For this project, I used greens, yellows, grays, and pops of red.
- Cut out squares for the end of each week.
- Put squares into your Xyron 1.5″ Sticker Maker.
- Place squares onto your planner.

- Using the Diamond Press Crafter’s Companion Die Cutter to cut out flag pieces.
- Select color
- Cut to fit into the pouch
- Set die cutter on top of the paper
- Set into pouch
- Suction Diamond Press onto the table
- Turn handle to run die cut through the machine
- Pop out flag piece

- Put flag piece into the Xyron 1.5″ Sticker Maker.
- Place flag sticker on top of square piece in planner.
- Continue to cut out die cuts and create stickers to decorate your planner.
- Add in your agenda for the week.
- Finish by adding additional embellishments to your planner.
I followed this method when creating my planner pages for the week. I started by cutting out squares for the end pieces. Then I started to layer on top of the square pieces. Then, I added some additional embellishments once I wrote in my agenda for the week. By using the Xyron 1.5″ Sticker Maker and the Diamond Press Crafter’s Companion Die Cutter and Embosser, I am able to create a one-of-a-kind design in my planner, which is also a working scrapbook for my family!
Disclaimer: I was given a Diamond Press Crafter’s Companion Die Cutter to use for the creation of this post. As a member of the Xyron Design Team, I am compensated for my design ideas. Some affiliate links may be provided in this post. All monetary compensation goes to the running of this blog. All opinions, thoughts, and creations are my own. I use these products frequently, and believe that are quality products, which is why I am sharing them with you!

")


Super coolness!! I’ve had my new planner for over a month and barely even cracked it open! I really felt overwhelmed with all the stuff and didn’t know exactly how to “plan” for my planner, lol! With all your great tips and inspiration, I now feel ready to tackle it and give it a go! Thanks so much for sharing and have a most blessed Easter weekend!!! 🙂
Thank you Linsey! You got this and once you get started you will totally see yourself being more productive!
My planner has sat for nearly a year because I hadn’t a clue where to start or what to do. I cannot tell you how thrilled I am to have found this blog and feel I’ll be starting to fill it up real soon!
Do you know the maximum width taken by the Diamond Press please. I have a lot of 2″ wide border embossing folders and this would be a life saver for evening projects by the fireside.
Deborah, I am so happy to hear that! The folders are about 1 7/8″ but your 2″ might fit, you’d just have to be really aware of how you put it in the press!