

We have a ton of Lego bricks. Like a lot. We have gotten Lego sets for birthdays. Lego bricks for the holidays. This has been one of my kids top gifts for the past 3 years. So our Lego storage was getting rather full.
Then, one day, my son asked to rebuild one of his old Lego sets. So over the weekend we decided to pull out the manual and get to work recreating this set.
Well, as it turns out, this was really changing since none of the Lego pieces had any rhyme or reason for where they were stored. We dumped out the Lego containers onto baking trays, Pyrex pans, plates, and even a few bowls to help us find the next piece for the set.
After a full day of this madness, we decided that this “system” was not going to work. We needed to sort the bricks into colors. I will be breaking down all the steps I took to get the Lego bricks sorted (it’s not difficult to figure out), and how we created Lego storage that works for all the kids’ Legos. Plus, I will share some ways to display Lego creations once they are complete!
The Best Lego Storage That Helped My Kids Reuse Old Legos
Some links may contain affiliates.
https://the-organized-mama.ck.page/ad3a966044
Sorting Lego Bricks Into Colors
Since we had the majority of the bricks already spread out, it was an easier process. Just really time-consuming.
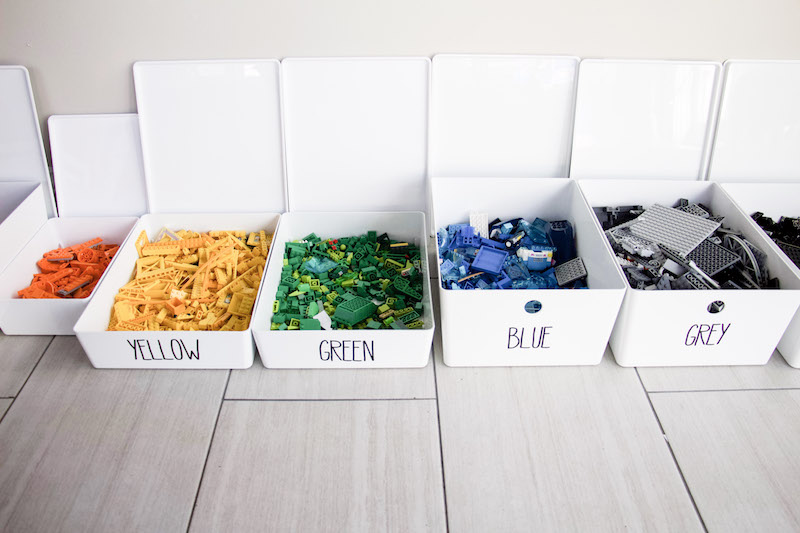
I started by using Ziploc bags. Each bag was a different color. I put one brick in each bag to start so I knew what color was going in each bag. Then I could reuse the bag once this sorting was complete.
I lined the Ziploc bags up in a line and started dropping Lego bricks into each bag based on the color. This is the obvious part of sorting the Lego bricks. But as I started to sort the bricks, I realized that we have a lot of wheels. Because we have so many wheels, it was easy to pull them out and create their own category.
I also made a category for “people”. This includes all the hair, bodies, and accessories that are included with the people that come in the Lego kits.
When a bag started to get too big, I found an empty container to use to fill that that color. That way I wasn’t adding more to full bags and having them overflow or get mixed up with other colors.
For the small pieces, I dumped them onto a tray to sort while sitting next to the Ziploc bags. This helped make it go faster since they are so small and tedious.
Once all the bricks were sorted, I needed to find something to store them.
Lego Storage Ideas
Being a professional organizer, I am all about not buying anything until you know what you have. Well, having all the Lego bricks divided up into bags was super helpful to see what we actually had in terms of colors. We had a ton of black, grey, brown, and blue. We had a bunch of red and pink, so I decided we would combine the two colors into red, since pink is a shade of red.
Then we had a decent size of green, yellow, the wheels. We had a small amount of orange and people.
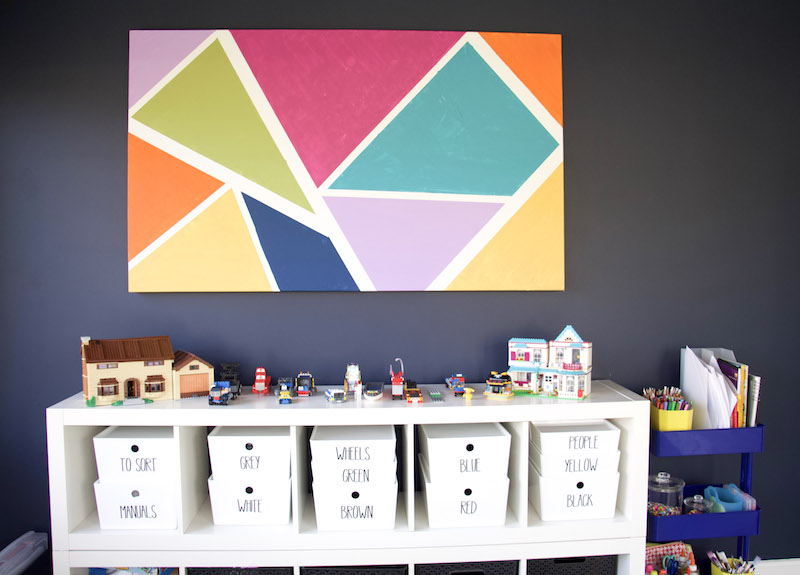
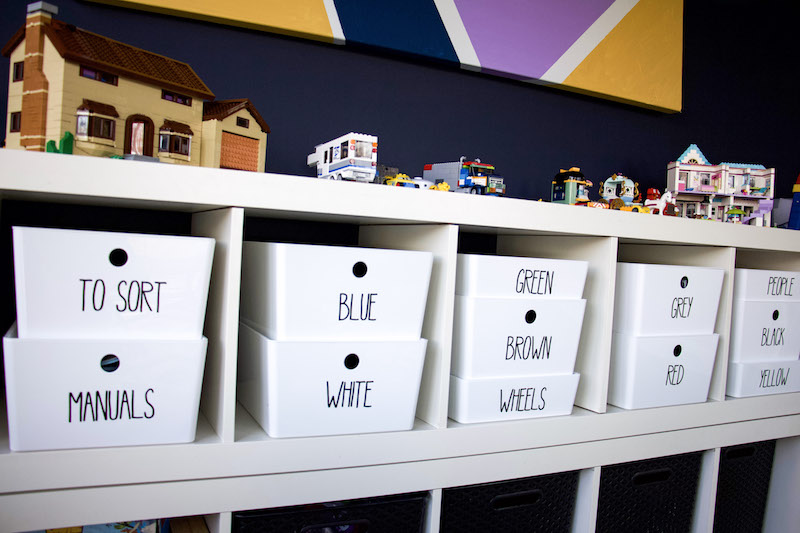
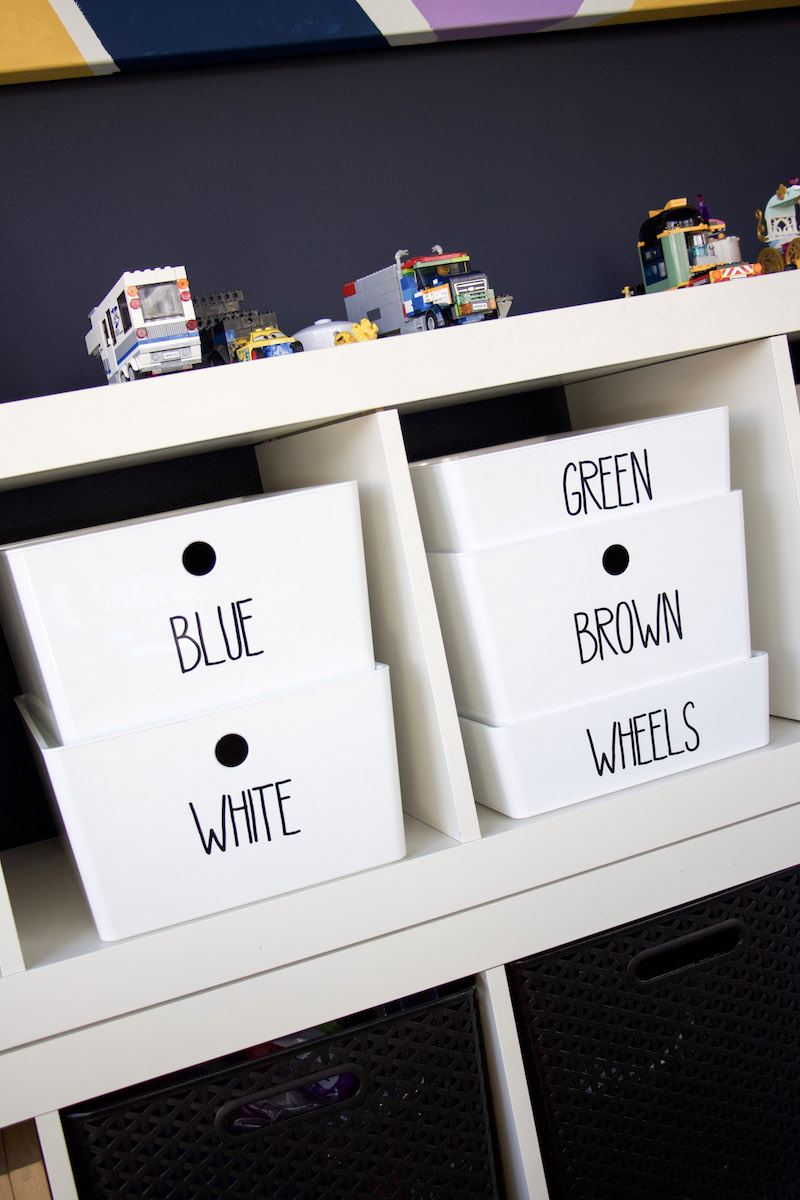
So we made a trip out to IKEA to grab my favorite bins… the KUGGIS. These bins have lids that act as trays for the Lego bricks. Making them perfect for sorting some of the larger bins.
We bought one bin for every color plus a bin for manuals and a bin that will be used for sorting. Each bin would be Lego storage for that particular color. Then we added labels to each of the bins. I sell these exact labels in my shop!
This sorting bin is the key when it comes to color-coding your bricks. This “to sort” bin is the one where all the Lego bricks that need to be sorted can go so you aren’t wasting time at the end of the night trying to color-code the bricks the kids took out that day.
Over the weekend, one of my kids chores is to sort the bricks. We put out each of the colored bins in a row against a wall. Then they take one of the bricks from the “to sort” bin and put it in the matching color bin. At first I supervised but they have gotten really good at it now that they have gotten the hang of it.
Since they were the ones who wanted the Lego bricks color-coded, I wanted to put this on them. I think it is really important for kids to take ownership of their decisions, especially when it comes to their toys. So this is how we hold them accountable, by sorting their Legos weekly. Plus, it is a great activity for when the afternoon “I’m bored” hits.
Displaying Lego Creations
Once the kids have recreated an old Lego set, or even constructing a new creation, you have to display their work. But how do you go about doing that??
Well, I had a client actually call Lego asking what they recommend because she was getting really overwhelmed. And Lego told her that Lego creations are meant to be displayed. The kids can take the Lego sets down to play then put them on a shelf to display when not in use.
But where do you get that much shelf space?!?!
I love the IKEA Kallax shelving unit because it gives you so much shelving storage.
But I have had clients who have used wall shelves to act as Lego displays for their kids Lego storage options as well.
Whatever you end up doing, just make sure there is room for multiple Lego creations.
This Lego storage system works best if your kiddos really want to rebuild old Lego sets or if they like building things in particular colors. We have created similar systems for clients based on what the kids want. Since there is some upkeep to this system, make sure it is what the kids want and make them responsible for maintaining after you teach them how to do so!! Then you know it will really benefit them while they play!
Want more Lego tips, check out this video to see how I display, organize and store our Lego bricks!

")


Can you break down which sizes of the Kuggis you got?
Yes, I bought the large bins for the colors I had the most bricks. For us, we had large bins for grey, black, brown, red (pink and purple), white, blue, manuals, and “to sort”. We had medium bins for yellow, wheels, and green. Small bins for the orange and people!
Of course it’s nice to build with the “proper” color when you’re following Lego instructions. But my kids love to create with whatever they find. Which means that – whether they’re rebuilding using instructions or not – being able to find the correct type/shape of piece is way more helpful for us. I have been using what containers we have, grabbing great deals on actual Lego brand storage (thank you Costco! – $15 instead of $50!), and I finally broke down and ordered a hardware/craft storage cabinet (with small drawers) from Amazon. I really love your accountability system of the weekly sort! Once we finish our sort when the cabinet comes in, we will have to implement something very similar!
The “to sort” bin is the best! I love giving the kids the responsibility to clean up after themselves without messing up the system the created!
Do you still have the lego bin labels available for purchase?
I am working on making them downloadable printables!!
Any updates on the downloadable printable labels?
Here they are: https://www.theorganizedmama.com/shop/color-coded-labels-for-lego-storage/
Great idea! Any reason you went with 2 single level kallax units VS one with 2 levels?
Thanks! We originally had two single Kallax units as window seats in our old playroom. So instead of purchasing new ones, we stacked them on top of each other to create the new storage unit! Want to show how easy you can transform those Kallaxes!
What are the dimensions of the boxes you used? They are labeled by dimensions at IKEA rather than small/ large. Thanks!
Hi Suzannah! The large boxes are 10 ¼x13 ¾x6 ”
The medium are 10 ¼x13 ¾x3 ¼ ”
and small are 7×10 ¼x3 ¼ “
Hi! I found the label link above, can I import this into my Cricut software to make actual vinyl labels or is this just for printing?
Hi Amanda! At this time this is only for printing!
Hi! I just bought the labels but am unsure what to print them on. Did you use clear sticker labels? Or just paper? Thanks!
I suggest printing off on clear sticker paper or printable sticker paper. These are perfect for printing then cutting: https://amzn.to/3lbR75b
Can you give me an estimate of how many gallons (filled ziplock bag) each container holds? I’ve got the legos sorted, and a trip to IKEA I’m the books 😉