
We Tried the Scandinavian Sleep Method—Here’s What Happened
Here’s a crazy thought, what if each individual in a bed has their own blanket that was just for them. No sharing with their partner. No tugging or tossing during…
This guide to organizing a craft closet walks you through how to set up and organize the crafts like a professional organizer would.

Let’s be real: craft supplies have a magical way of multiplying when you’re not looking. One minute you’re just trying out a new hobby, and the next thing you know, you’re drowning in scrapbook paper, half-used paint tubes, and yarn that somehow reproduced while in storage.
Sound familiar? You’re not alone.
I’ve always loved crafts—from knitting and scrapbooking to painting and stamping—but storing all those beautiful supplies? That’s a whole different creative challenge.
In this post, I’m sharing the ultimate guide to organizing a craft closet so you can actually use what you already own, feel inspired (not overwhelmed), and stop running to the store for stuff you totally already have.
Now if you are in the crafting world, you are probably a craft supply hoarder. That means that you hold onto scraps of craft supplies in case you may need them again. I know this because I am one too. I hold onto pieces of fabric, vinyl, scrap paper, you name it.
But that needs to stop. Because those hoarding tendencies are keeping you from actually using what you have already.
Hear me out on this one. You have your scraps in the same spot as your regular craft supplies. So you start looking for the supply you need in your craft closet. But you notice that you only have a little bit of one color left because you saw the scrap. So you run to the store to buy more.
But if that scrap wasn’t there, would have you even known that you needed it? My guess is no. Because when you don’t see that one little bit, you are more likely to find something else that you already have.
So stop being a hoarder. And that means decluttering stuff. Get rid of your scraps. Recycle those papers you don’t use. Donate things that can be used by someone else. When you declutter first, you are able to see what things you actually use and enjoy before buying new things.
Start your craft closet organization by decluttering:
Once you have decluttered the items that you don’t need, it is time to make a plan for your craft closet. That plan is how you are going to put things away.
Now this plan will depend on the space of your closet, how many craft supplies you have, and how frequently you get these items.
I like to write down a list of the supplies I have. Then I will make sticky notes for each of the supplies. I will put those stickie notes on shelves before I put anything away. This way, I can rearrange the sticky notes to make the craft closet work for me before I put anything on the shelves.
Then I start adding the items on once I am happy with where everything is placed.
You can also store all your craft supplies by color. Create sticky notes for each of the colors you want to store. Then place them where you want them to do. Find storage options that work for your color-coded craft closet!
Here’s how it works:
Read more ways to create plans for your craft supplies below:
How To Organize Craft Supplies
If you’re a visual crafter (hello rainbow-lovers!), you might prefer to organize your supplies by color. This works especially well for:
Try using clear bins or color-coded drawers to keep everything easy to see and access.
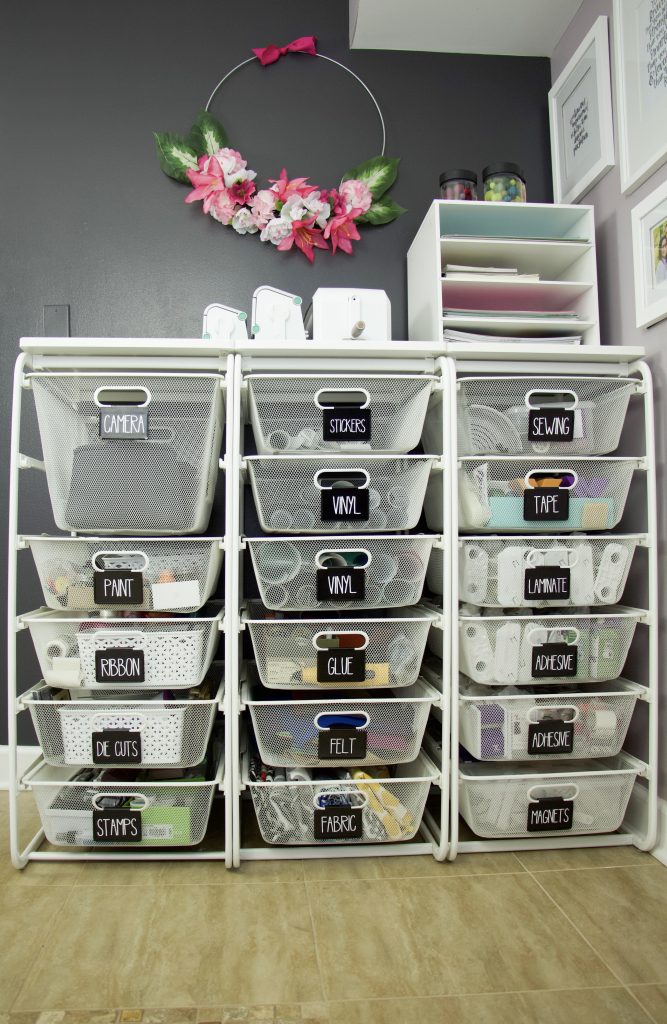
To put things away, you are going to need storage options. I have a ton of different options that I have used over the years, so I am going to share a few.
If you can, get a closet organizing system. This system will help you to store your craft supply items so that you can make sure they stay organized.

Photo via The Container Store
Using clear shoeboxes that are stackable are another great option for organizing your craft supplies.
I have also used boxes to store supplies so I didn’t have to buy anything new.
Portfolio boxes make excellent storage containers for larger papers. And paper organizers are also helpful for the scrapbook paper.

Using magazine holders to hold rolled vinyl for your cutting machine is great.
And keeping your cutting machines on a rolling cart help with space.
My favorite storage solutions are below:

You also have to label all your craft supplies in their specific storage bins. Do not rely on visually seeing them. Add the label!
This is where I like getting crafty with labels. I have had fun making interesting labels using my craft supplies.
Now there are a few things that you need to do in order to keep your craft closet tidy. The first is to take inventory of what you have. Yes, inventory. Create a list of all the items you have and put that on paper. Hang it on a clipboard in your closet. This way you know what you have. You can also add a list of items to get when you go to the craft store. Then you aren’t wasting precious craft time searching for items.
Another thing is to be consistent with cleaning up after you are done crafting. Maybe you do it on the weekends. Or every Monday you clean and tidy your workspace. Just have a plan for how you are going to keep the crafts organized.
When I created a craft closet for an in-home client, she had to clean up the space every Sunday night. It was part of her weekend routine. So after the kids went to bed, she would put all the supplies back into the containers and store in the closet. We kept it simple so she could keep up with the system. And she has a plan for keeping the closet tidy!

Now it is your turn to transform your craft closet into an organized space that you can use because you can find things when you need them.
Start by decluttering all your things. Stop being a craft hoarder.
Then make a plan for how you want to store your items. Store those items in bins or organizing closet systems that meet your needs.
Then add labels to the bins or drawers.
Finally, create a plan to keep the closet organized. Set a day of the week when you will tidy up your space so you don’t have to do a big declutter again!


