
We Tried the Scandinavian Sleep Method—Here’s What Happened
Here’s a crazy thought, what if each individual in a bed has their own blanket that was just for them. No sharing with their partner. No tugging or tossing during…
Tips for organizing pictures on your computer by a professional organizer. Steps are broken down and easy to follow with simple descriptions.

I have wanted to write a post on how to organize pictures on your computer for a while. But I have been dragging my feet on writing it.
Why?
Well, because I actually need to do what I am telling you to do in order to get all my pictures organized on my computer.
Like, I have to actually take the time to look at ALL the adorable pictures of my kiddos on my computer, and sort them into files.
While walking down memory lane is a super-fun way to spend time, it’s also quite daunting.
If you don’t know me well-enough yet, I won’t write something that I don’t actually do. I don’t roll that way. So if I say that you should get your pictures organized on your computer, you bet your tush I will do the same. So here I go!

Now, where to start when you have over 11,000 pictures on your computer ? I’m not counting the pictures I have on an external hard drive!
Read on for some easy steps to organize pictures on the computer!
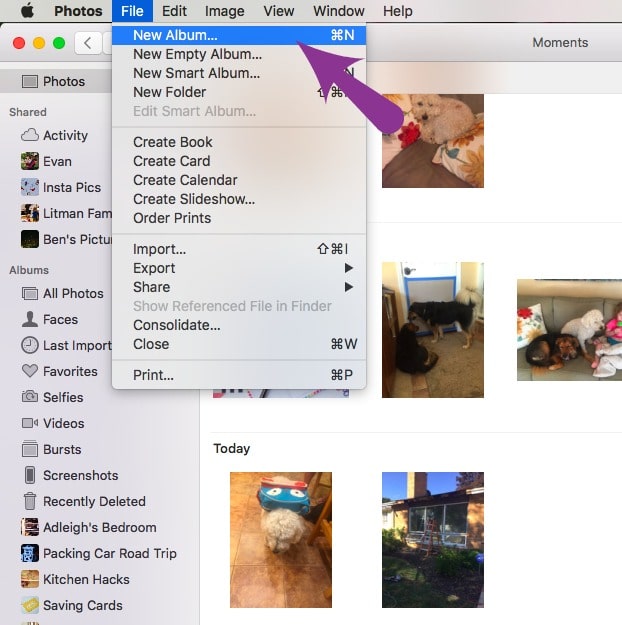
Start by creating some general folders within your photo library as a quick “dumping space.” I started by creating folders for each family member.
These folders are where I put all our selfies and individual photos of each family member.
I also created a folder for the dog, because I take a lot of pictures of him, too! And I created an album that will hold pictures of both kids together.
Start at the very beginning of your photo library and start adding pictures of your family into the different family albums.
If you are using iPhoto, just drag your picture into the designated album. You can also click “command” and select multiple photos to drag and drop into an album.
As you start going through photos, you might find that you have some holidays, events, or other groupings of photos that will go together.
Add folders as you go with the different topics together.
If I notice that there are multiple people in a photo, I might move that photo into two different albums so I can find it easily. It’s like cross-referencing your photos!
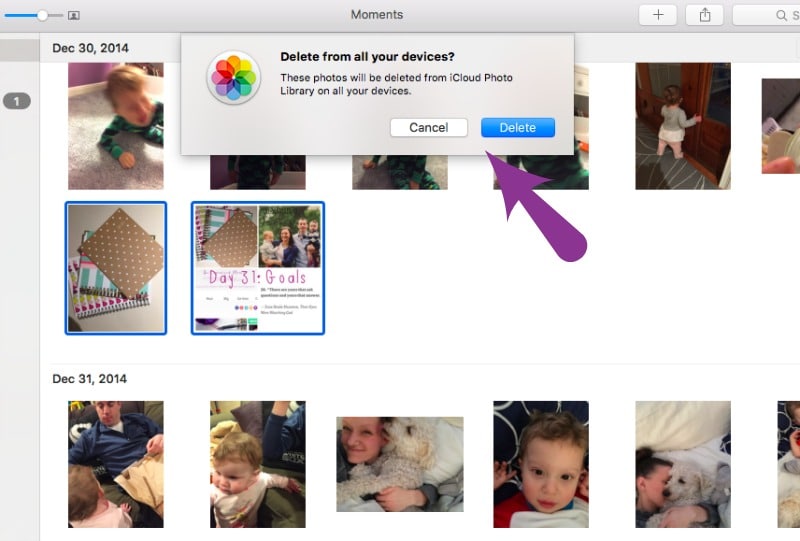
As you start to go through pictures, you might find some really bad pictures.
Like pictures your kids took on your phone that are now on your computer, because of “the cloud”. Delete those pictures if they aren’t cute or funny.
My son likes to take pictures of the carpet so I had a roll of like 12 photos of his carpet in his bedroom.
I just deleted them all so they aren’t taking up space on my computer! Honestly wouldn’t have known they were there unless I started to clean them out!
This entire process might take time. Like a few days (or weeks). I will be honest, I am still working on organizing the pictures! But it feels soooooo good to have them started!
Now, when I upload new photos, I will just drop those few into the different folders so I don’t have to keep spending large amounts of time organizing my photos.

My goal is to slowly, but consistently, put the photos into folders and delete all unwanted photos.
And I will print off some photos! I have been so bad about printing off photos because it was too overwhelming, but now that they are (mostly) organized, I can see what cute pictures I have of our family!
Now there are a few programs that you can use to keep your photos organized, but I have found that organizing pictures on computer is the best option for me.
So my challenge to you is to start organizing your pictures on your computer. Follow the steps above to help you get started!
How To Organize And Store Photos And Artwork For The Entire Family
The Art Of Hanging Pictures Without Nails
Micro-Decluttering: Why You Should Try An Easier Version Of Decluttering
Some links may contain affiliates.


