How To Make Vinyl Stickers Using The Silhouette Cameo 4
DIY ProjectsLabels
April 16th, 2020
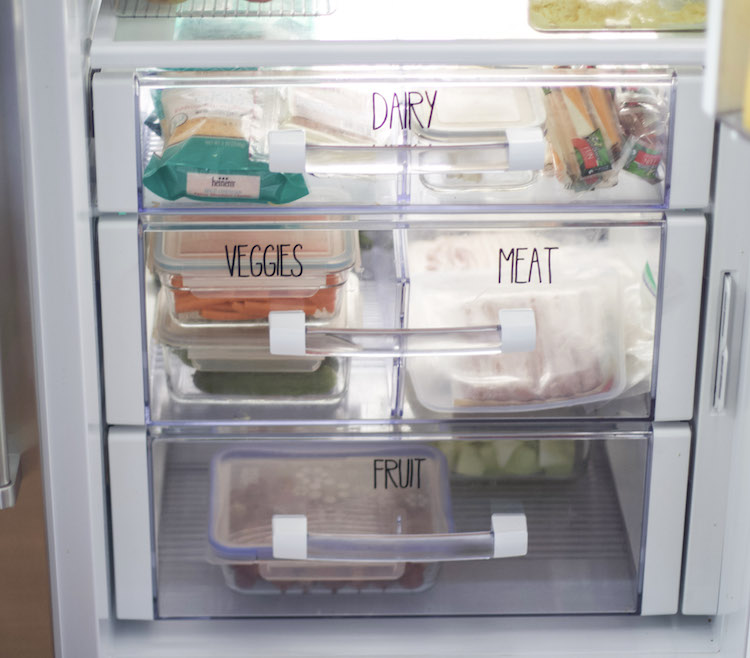
Using vinyl stickers to label things is a great way to add some function and beauty to any organizing project. In order to create these labels, I am breaking down how to make vinyl stickers. I am walking you through how to create the labels, how to cut them out using the Silhouette Cameo 4, […]
Using vinyl stickers to label things is a great way to add some function and beauty to any organizing project.
In order to create these labels, I am breaking down how to make vinyl stickers.
I am walking you through how to create the labels, how to cut them out using the Silhouette Cameo 4, and how to adhere them to any smooth surface.
How To Make Vinyl Stickers Using The Silhouette Cameo 4
This post is sponsored by Silhouette Inc. All thoughts and opinions are my own. Some links may contain affiliates.
Open Silhouette Studio
The very first thing you have to do when creating vinyl stickers is to open up Silhouette Studio.
If you are brand new to using a Silhouette Cameo, then I would start here.
Page Set Up
Set the page to fit the size of the vinyl you are cutting. Typically vinyl is 12″ wide. The height depends on how much you are cutting. Since you don’t need a mat to cut the vinyl, you can make the height however long you need!
For this project I was only cutting out a few vinyl labels so I only needed a small amount of vinyl.
Add Text
After the page is set up, it is time to add the text. Start by clicking the letter “A” button on the right side of Silhouette Studio. Type in your text. Then you can adjust the font and the size.
For most of my projects, I use fonts from a website called Fonts For Peas. I love the font options because they look like handwriting!
Cut Vinyl Stickers
When you are happy with the sizing, text, and labels, it is time to cut!!
Before I even start to cut, I check the cut lines to make sure everything I want cut will be cut. If things are outside the cut lines then the Silhouette will not cut that part of the vinyl. I may or may not have cut half a label because I didn’t check the cut lines before cutting.
Once you know you are good with all the words being fully cut, then it is time to send to your Silhouette.
Add the vinyl to the Silhouette Cameo. With the new Cameo 4, there is a holder to keep the vinyl in place as you cut.
This has been a game-changer for me, since I love vinyl labels!!
Since the new Cameo also has a sensor to cut vinyl based on a setting in Silhouette Studio, you don’t have to adjust the blade either!! Another game-changer for me since I always struggled with getting the blade to the right setting.
Adhere To Surfaces
After all the labels are cut, remove the vinyl from the Silhouette by pushing the button to remove. Then cut out each label using scissors. I peel the vinyl around the label off and use tweezers to remove the unwanted vinyl in the middle of some of the letters.
Then I cut out the transfer paper to use to adhere the vinyl label to the surfaces. Remove the transfer paper and adhere over the top of the label. Then rub the label and remove the backing that the label is on. Now you created a sticker to rub onto a smooth surface.
Rub that sticker onto the surface and slowly remove the transfer paper. Now you just learned how to make vinyl stickers using the Silhouette Cameo 4!!
Watch All My Label Tutorials
Products To Use To Make Vinyl Stickers
Hey, I’m Jessica! Welcome to The Organized Mama—where organizing is made ADHD-friendly, doable, and totally overwhelm-free. As a former in-home organizer (and mom!), I’m here to help you simplify your home with easy-to-follow systems that actually work with your brain, not against it. Whether you're organizing with kids, figuring out where to start, or just feeling buried in stuff, you'll find real-life tips and support right here.
Sometimes, all it takes is a little creativity to turn a room into a more functional, organized, and stylish space. Learning how to make a room divider is one of…
I am obsessed with labels. I think they help with organizing everything. And there are many ways to label things in your home. One tool I use to label is…
Are you tired of staring at blank walls but unsure how to bring life to them? Hanging pictures is an excellent way to add personality and style to your home.…